Preferences
Preferences
You can customize the settings of SBTengine using the 'Preferences' in the 'File' menu. The following preference options are available:
1. General
2. GSSP
3. Colors
4. Updates
5. Sample Name / Locus Assignment
6. Loci
7. CWD list
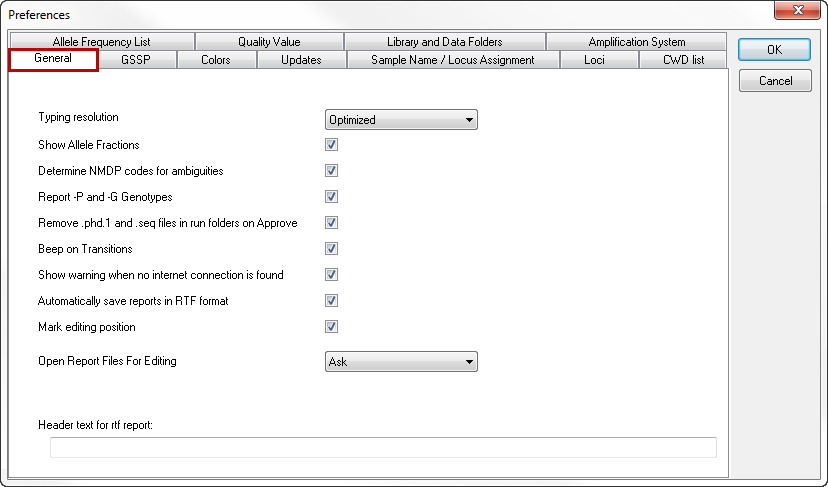
Typing resolution
The typing resolution drop-down menu allows you to select the preferred level of resolution that will be displayed in the Allele assignments box of the Sequence Overview window.
There are 4 options:
- 2-Field: Only the first 2 fields are shown, even if a higher level of resolution was obtained.
- 3-Field: Only the first 3 fields are shown, even if a higher level of resolution was obtained.
- All fields: Up to 4 fields are shown.
- Optimized: At least 2 fields are shown. If the 3rd and 4th field have been unambiguously resolved, they will also be shown.
Determine NMDP codes for ambiguities
Toggling this box activates the reporting of NMDP codes in the -not approved- typing results report.
Report -P and -G genotypes
Toggling this box activates the reporting of -P and -G genotypes in the -not approved- typing results report.
Remove *.phd1 files and *.seq files in run folders on Approve
SBTengine only uses the *.ab1 files for analysis. The *.phd1 files are quality score files while *.seq files are text files with the basecalling. In general these are automatically generated by the sequencer for other applications. Ticking this options box will remove these files when a sample is approved, thus keeping your work folder tidy.
Beep on transitions
With this option selected, a beep is played when all inconsistencies in the analysis process are resolved. This way you have an audible aid when the crucial positions are displayed.
Automatically save reports in RTF format
Upon approval of a typing, an RTF file of the report is automatically generated and stored in a 'Report' folder within the active work folder.
Show warning when no internet connection is found
With this option selected, you will receive a warning when SBTengine cannot detect an internet connection.
Mark editing position
The nucleotide position that is selected in the Sequence Overview window is indicated with a black circle and marked by two yellow bars. This allows easy comparison of this nucleotide position between different sequence traces. By unchecking the 'Mark editing position' box, you hide the yellow bars and only keep the black circle as a marker.
Open report files for editing
When toggled on you are asked if you want to open the typing report file after approving the typing of a sample.
Header text for rtf report
You can type a text here that will be shown in the header of each report that is stored in the 'Report' folder. You can use this for example to print the name of your institute on top of each report. The header will only be shown in the saved reports. When you do not save the report but print directly from SBTengine, the header will not be shown.
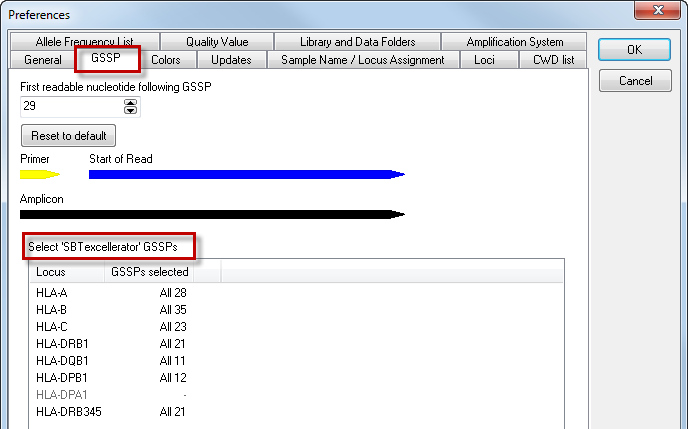
For the selection of the GSSP primers to resolve genotype ambiguities, the DART assumes a default sequence read of 29 base pairs after the end of the primer. This distance may vary, depending on your sequencer and the chemistry. Should you notice that you have a consistent longer distance between the end of the primer and start of the sequence read you may adjust this in the GSSP preferences. This way DART takes this information into account when selecting GSSP primers to resolve the genotype ambiguities.
By default, all GSSPs are selected for use. By clicking on a locus, a list of all available GSSPs with their corresponding name and specificity is shown. GSSPs can be selected and deselected by ticking the checkboxes. For example, when a certain GSSP has run out, you can deselect the box. After pressing the 'OK' button, the deselected GSSPs will not be shown for solving ambiguities.
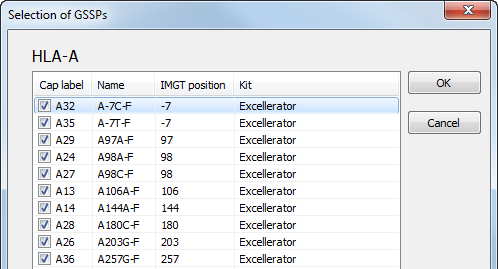
The GSSP list can be sorted by clicking on the column header: Cap label, Name, IMGT position or Kit.
For AlleleSEQR users, the list is extended by default with the AlleleSEQR GSSPs:

By clicking on a locus, a list of all SBTexcellerator and AlleleSEQR GSSPs is shown:
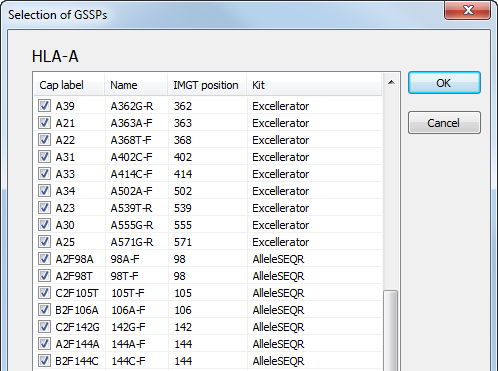
Specific GSSPs can be deselected, as described above.
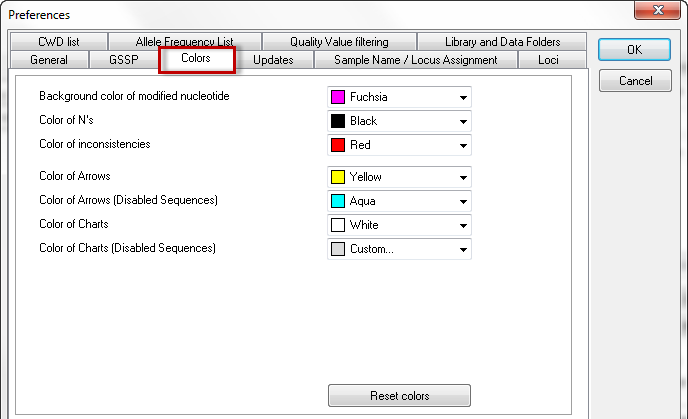
The color preferences allow you to customize the color settings. You can select your desired colors in the dropdown menus. By clicking the 'Reset colors' button, the colors are set to default.
This menu allows you to set:
- the background color of modified nucleotides
- color of N's
- color of inconsistencies
- color of arrows
- color of arrows (Disabled Sequences)
- color of charts
- color of charts (Disabled Sequences)
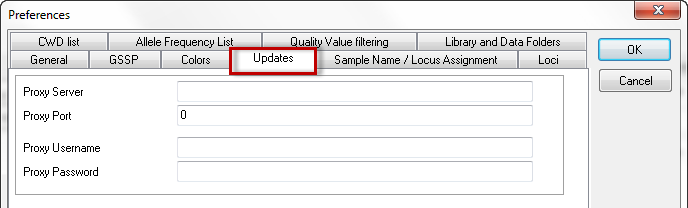
If you are not running SBTengine as an administrator you most likely will have limited rights and will therefore not be able to fully complete automatic updating. To circumvent this inconvenience, the administrator may fill in his username and password in the appropriate fields within 'Preferences'. Now updates will be carried out successfully as only this process is carried out as an administrator. This is an elegant way of securing accessibility to the computer as requested by the general administrator, without limiting the profound advantages of automatic updates via the internet. User and password Information of the administrator will be securely stored and is not accessible to others.
The network of your institute may limit your access to the internet. In this case the automatic updates may not work. Your IT specialist may enter the Proxy Server and the Proxy Port to facilitate accessibility of SBTengine updates. However, these fields are empty by default and should only be completed when requested by authorized GenDx personnel.
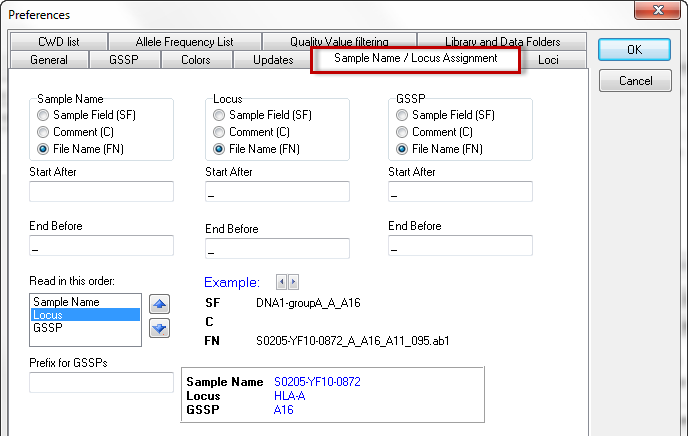
You can set the automic naming for the sample name and locus with this option. Please read the Automatic Name / Locus Assignment for more detailed information.
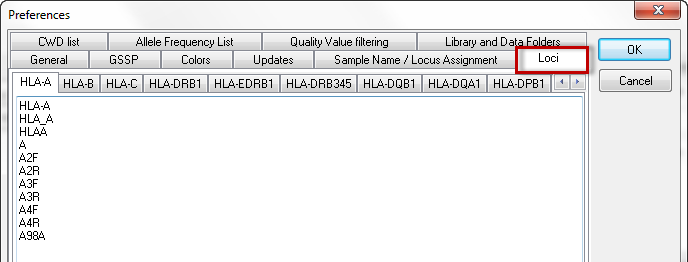
With this option you can set the text for the loci by which SBTengine assigns the locus. For example, the locus HLA-A is assigned to sequence files where the locus is indicated by the text HLA-A, HLA_A, HLAA, A, A2F, A2R, A3F, A3R, A4F, A4R, or A98A. You can also define your own text by adding it to the list.
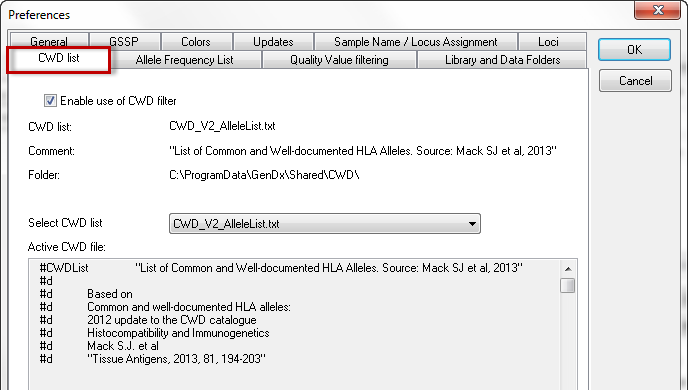
GenDx ships three lists with common and/or well-documented (CWD) HLA alleles. Your preferred CWD list can be selected in the dropdown menu. Details about the source of the data can be found in the header of the files.
CWD lists can be used to organize the exact matching genotypes. By checking the box 'Enable use of CWD list, they can also be used to filter crucial positions.
The default path where CWD lists are stored is GenDxRoot\Shared\CWD\. This path can be changed in the preference settings of 'Library and Data Folders'. You can create your own 'CWD-like' list. If placed in GenDxRoot\Shared\CWD\, this file can be selected through the CWD List Preferences. Please note that one can add a file, but can not modify the original file shipped with SBTengine. If one wants to make changes to this file, first make a copy and perform the changes in this file. For information on how to modify or create a frequency file, please refer to this section.
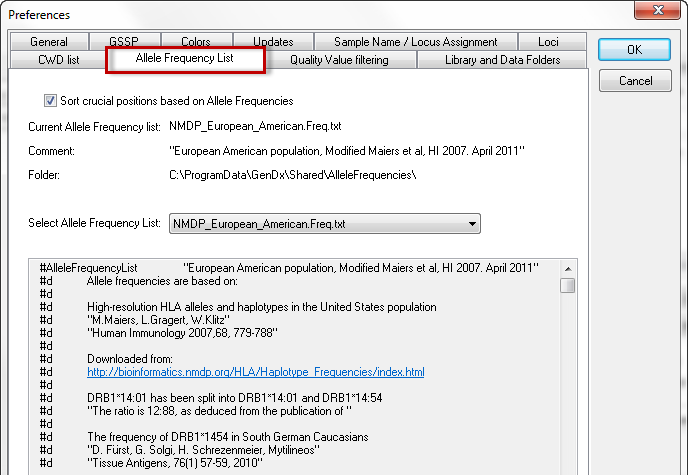
GenDx ships four allele frequency tables based on data published by the NMDP:
- African American allele frequencies
- Asian allele frequencies
- European American allele frequencies
- Hispanic allele frequencies
Your preferred allele frequency list can be selected in the dropdown menu. Details about the source of the data can be found in the header of the files.
Allele frequency lists are used to sort the exact matching genotypes on expected frequency. By checking the box 'Sort crucial positions based on Allele frequencies', these frequencies are also used to sort the crucial positions.
The default path where allele frequency lists are stored is GenDxRoot\Shared\AlleleFrequencies\. This path can be changed in the preference settings of 'Library and Data Folders'. You can add your own allele frequencies lists. If placed in GenDxRoot\Shared\ AlleleFrequencies \, this file can be selected in the Preferences.
Please note that one can add a file, but can not modify the original file shipped with SBTengine. If one wants to make changes to this file, first make a copy and perform the changes in this file. For information on how to modify or create a frequency file, please refer to this section.
In SBTengine, different quality values (QVs) are displayed:
QVs for each sequence trace displayed in the Sequence Overview window
- The algorithm used for these QVs are based on multiple sequences.
- These QVs can be used to sort the exact matching genotypes based on the quality of the crucial positions.
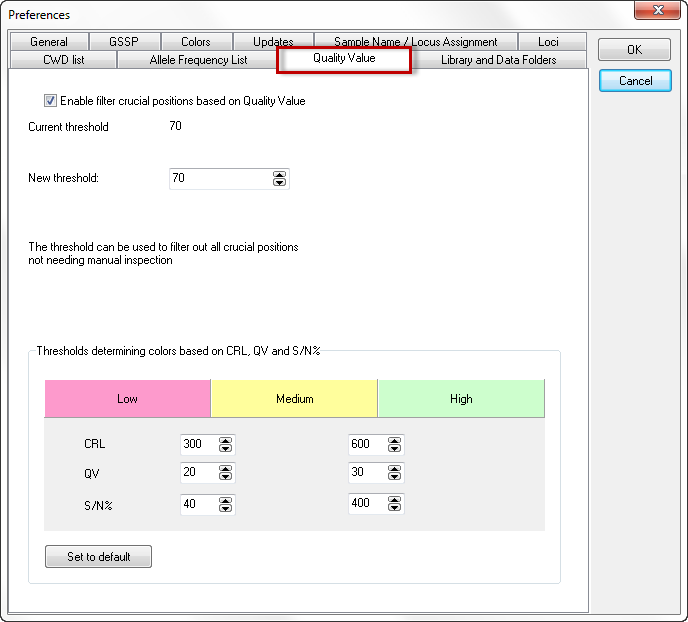
- These QVs can also be used to filter out all crucial positions of good quality that do not need manual inspection by checking the box 'Enable filter crucial positions based on Quality Value'.
- The default threshold setting is [QV70]. You may increase the stringency of the filter by increasing the QV threshold to a value higher than 70.
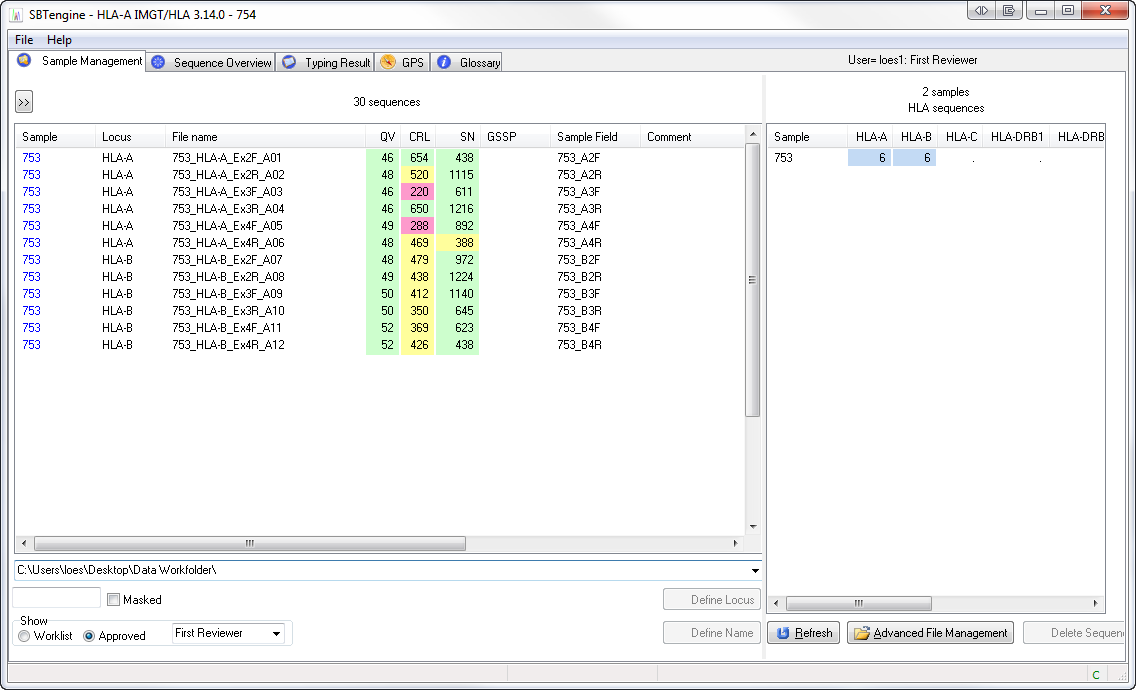
QVs for each sequence trace displayed in the Sequence Management window
- The algorithm applied for this QV is the average base call quality in the (Contiguous Read Length (CRL)
- The value differs from the QVs displayed in the Sequence Overview window and is not used for filtering of crucial positions
- The sequence quality of each sequence trace can be derived from three values: the CRL, QV and S/N%.
- The color patterns applied can be used to obtain an overview of the quality of sequence traces. The CRL, QV and S/N% values of each trace are shown in the Sample Management window. High, intermediate and low QV, CRL and S/N% values are displayed in the colors green, yellow and red, respectively. The color thresholds can be adjusted by changing the CV, CRL and S/N% threshold values in the preference settings.
- CRL (Contiguous Read Length):
The CRL is the longest uninterrupted stretch of bases with a good quality value.
The default threshold setting between low and intermediate is [CRL300] and between intermediate and high is [CRL600].
- QV (Quality Value):
The QV in the Sequence Management window is the average base call quality in the CRL.
The default threshold setting between low and intermediate is [QV20] and between intermediate and high is [QV30].
- S/N% (Signal Noise Ratio):
S/N% is the mean value of the G, A, T and C S/N% as indicated in the trace file.
The default threshold setting between low and intermediate is [S/N40] and between intermediate and high is [S/N400].
This setting applies for the Genetic Analyzer ABI 3730. For the ABI3130 the following settings can be used: [S/N20] and [S/N200].
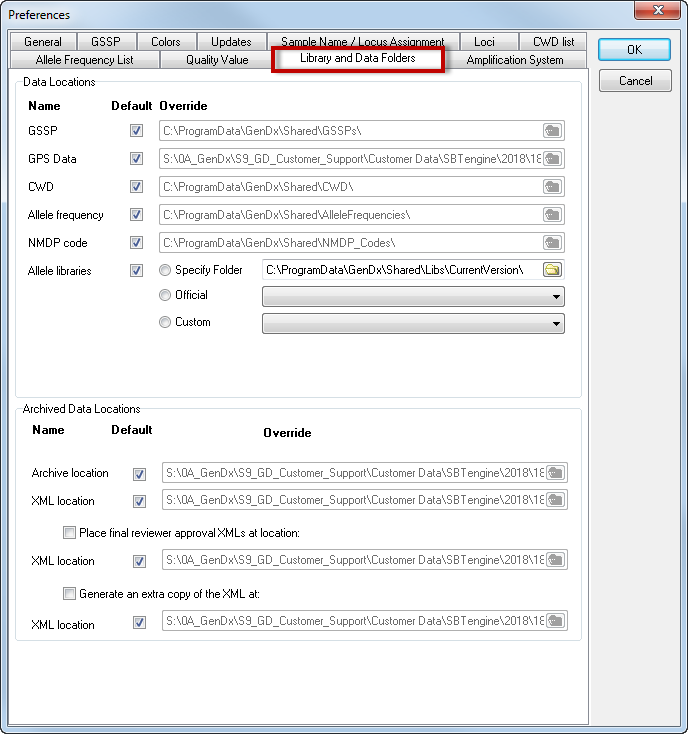
The 'Library and Data Folders' tab allows you to change the data folder locations used by SBTengine. This can be useful if you wish to use a central shared network location such that all users use the same libraries and data files at the same time or if you are using custom data. All data files installed with SBTengine are stored in a folder referred to as GenDxRoot. The exact path of GenDxRoot depends on your version and installation of windows. The default locations, assuming Windows is installed on your C drive, are:
- Windows XP C:\Documents and Settings\All Users\Application Data\GenDx\
- Windows Vista C:\ProgramData\GenDx\
- Windows 7 C:\ProgramData\GenDx\
With each update of SBTengine, the data files at the default locations are automatically updated. We therefore recommend using the default settings by checking all the checkboxes in the 'Default' column. Unchecking the checkboxes in the 'Default' column for a folder location unlocks the edit box to its right, allowing you to specify a custom location for each type of data individually.
How to redefine the location of the allele library folder?
The default location of the allele library is GenDxRoot\Shared\Libs\
At this location, three folders are present:
- 'CurrentVersion': Contains the allele libraries of the current version of SBTengine.
- 'PreviousVersions': Contains allele libraries of previous versions, each in separate folder
- 'UserLibs': Can be used by the user to maintain user-defined allele library combinations
In the Library preferences, you can select one out of 4 sources for allele libraries:
Source 1. Check the 'Default' checkbox. This selects the allele libraries installed with current version of SBTengine.

Source 2. Select 'Specify Folder' and browse to a user-defined folder containing allele library files.

Source 3. Select 'Official' and select a library from the dropdown menu next to 'Official'. This option is reserved for libraries previously released by GenDx.

Source 4. 'Select 'Custom' and select a custom allele libraries folder.
- First, create in a folder in GenDxRoot\Shared\Libs\UserLibs\
- Copy the libraries you need into this folder, e.g. only the class I libraries of a particular release.
- Reopen the preferences screen in SBTengine.
- Select the folder you just created from the dropdown menu next to 'Custom'.
How to choose an alternative Archive or XML folder?
Checking the checkbox in the 'Default' column results in the archive folder being the 'Archive\' folder in your workfolder, and the XML files are saved in the 'xml\' folder in the Archive folder.
In the box 'Override', you can manually specify an alternative folder that does not have to be in your workfolder. Keep in mind that the manually specified folder stays the same if you open another workfolder.
Please note: we recommend only altering these settings with instructions from GenDx.
Checking the checkbox for 'Place final reviewer approval XMLs at location:' results in a copy of the XML file being saved in a second XML folder after final reviewer approval. When the 'Default' box is checked for XML location, the second XML folder is the 'xmlFinal' folder in the Archive folder. In the box 'Override' you can manually specify an alternative location.
Saving a copy of the XML file in a second folder after final reviewer approval, allows you to change this XML file (for example name or extension) without having an effect on the Archive function of SBTengine. This can be used for example for import of the XML files into a Lab Information System.
Checking the checkbox for 'Generate an extra copy of the XML at:' results in an extra copy of the XML file being saved in a second XML folder after first reviewer approval. When the 'Default' box is checked for XML location, the second XML folder is the 'xmlExtra' folder in the Archive folder. In the box 'Override' you can manually specify an alternative location.
Saving an extra copy of the XML file in a different folder after first reviewer approval, allows you to remove or change this XML file (for example name or extension) without having an effect on the Archive function of SBTengine.
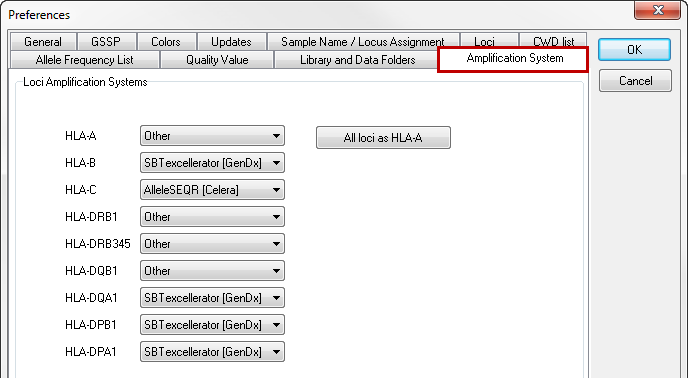
In sequence analysis, the amplification primer site is sometimes included in the sequences. These primer annealing sites may not be included in the analysis, since it cannot be guaranteed that the HLA allele sequences are identical to the primer sequences. Therefore, the annealing sites for SBTexcellerator and AlleleSEQR are included in SBTengine, to allow exclusion of these regions.
In the "amplification system" tab, the amplification system you are using can be selected for each locus individually. The default setting is 'other', meaning that no specific regions are excluded from analysis.
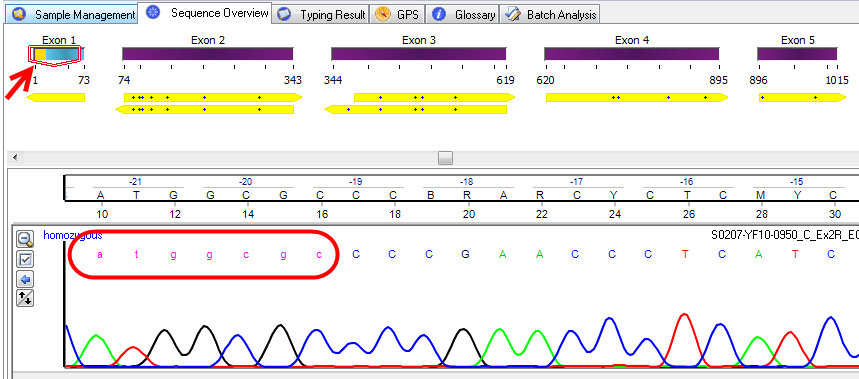
In the example below, an amplification system has been selected for HLA-C. In the Sequence Overview window the beginning of exon 1 has been marked yellow, indicating that this area is not considered for analysis. In the electropherogram these bases are represented as pink colored lower case letters. Since these bases are excluded from analysis, modifying them does not influence the typing.
Besides to selecting the amplification system via preferences, this can also be selected in the "sample management" window. To do this, right-click on a sample and select "Define Amplification System".
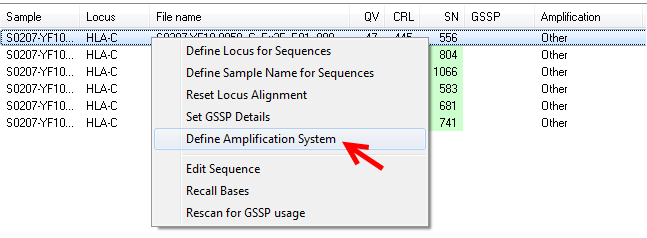
If you re-open samples which have already been approved, the only way to change the amplification system is via the sample management window, this is not possible via preferences.