Reports
For a fast PDF report of a sample, right-click on a sample name in the Overview screen, and select "Save PDF report".
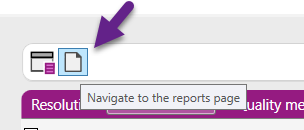
For a detailed customized report, click the 'Reports' button on the top of the screen:
Scope

First you have to make a selection for the scope of the report: entire project, a group of samples, one sample or one locus:
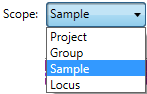
When you have selected group, sample or locus, then you have to make a further selection in the dropdown menu:

Report Content Options
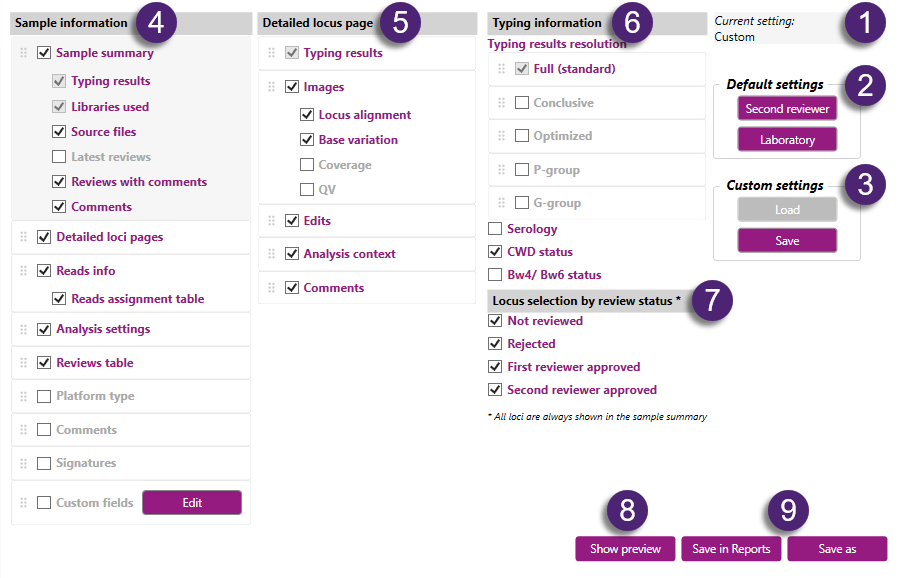
In this window the content of the report can be customized by selecting different settings and options:
Settings:
1. Current settings:
This shows the settings that have been loaded: default settings 'Second reviewer' or 'Laboratory', or the saved 'Custom' settings.
2. Default settings
- Second reviewer: this will load the default 'Second reviewer' report settings. This shows a report which contains only the typings that have been approved by the second reviewer. When the typing result is not approved by the second reviewer, then it says 'Not reviewed'. The settings are identical as when selecting the 'Approved by second reviewer' report type with 'Full report' style in previous NGSengine versions.
- Laboratory: this will load the default 'Laboratory' report settings. This shows a report which contains all the typing results and shows what has been accepted or rejected by the first reviewer and the second reviewer, or has not been reviewed at all. The settings are identical as when selecting the 'Laboratory' report type with 'Full report' style in previous NGSengine versions.
3. Custom settings
When custom settings have been selected (see below for options) these settings can be saved by clicking on 'Save'. NGSengine will show a warning: select 'Yes' to overwrite previous settings.
After saving, these custom settings will be loaded automatically the next time NGSengine is opened. This is user specific.
When later the settings have been changed, it is possible to go back to the custom settings by clicking on 'Load'.
Options:
Options for which information will be shown in the report can be selected by checking or unchecking the checkboxes. Also can be selected in which order the information is shown in the report, by dragging the items in the desired order.
4. Sample information:
- Sample summary: shows the typing results with review status and amount of edits, the allele ambiguities and the IMGT library used for each sample. It can also be selected to show the name of the source files, the latest reviews, the reviews with comments and/or the sample comments. All information that has been selected here will be shown on the sample summary page.
When the typing result has a mismatch in the priority regions (Co+) or (Ex+), then the allele is depicted in bold orange letters. Priority regions are the exons with their splice sites, plus the intron regions that enable correct identification of the presence or absence of particular null alleles. The Core+ or Exon+ mismatches are shown below the typing result:

- Detailed loci pages: shows a detailed page for each locus. Which details will be shown for each locus can be selected under 'Detailed locus page' (see below).
- Platform type: shows which sequencing platform has been used to generate the data.
- Reads info: shows reads information such as total number of reads, mappablility and software version used. It can also be selected to show a reads assignment table (number and percentage of reads assigned to each locus).
- Analysis settings: shows the locus default settings for each locus.
- Reviews table: shows a table for which reviews have been made, by which user, the review level, the review action (approve or reject) and the review date and time.
- Comments: shows the comments that have been added to the sample.
- Signatures: shows a section for the signatures (name and date) of the technician and the person who does the verification.
- Custom fields: The Custom Fields tab allows you to add customized information to the reports. The custom field can be dragged to any location in the Sample Information column by clicking and holding the mouse button, then dragging it to the desired position.
The "Custom fields" tab can be enabled by checking on the indicated box below:
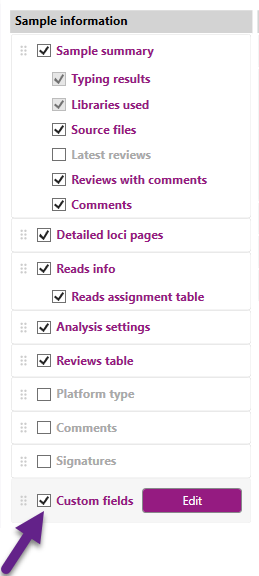
Click the Edit button to define or modify the custom fields you want to include in the report. After which a new window will pop up, this window is called the "Edit custom fields" window. It allows to:
- View existing custom fields
- Add new custom fields
- Remove any existing custom fields with the use of the "Remove" button
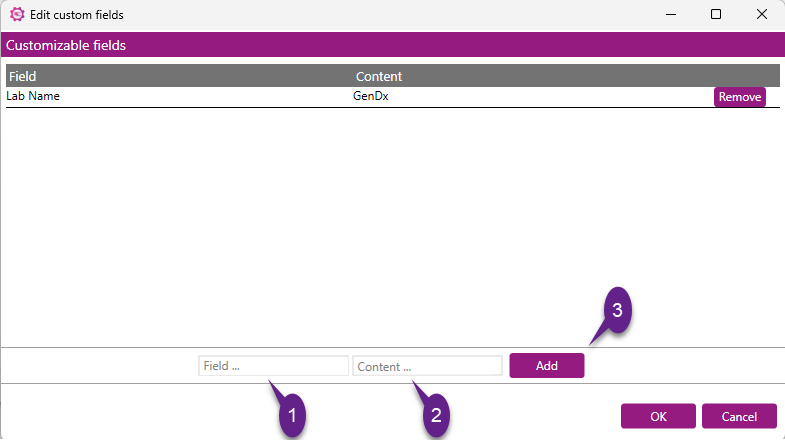
Steps to Adding a Custom Field:
1) Enter Field Name
- Click on the textbox labeled "Field ...".
- Type in the desired name for the new field (e.g., "Department").
2) Enter Field Content
- Click on the textbox labeled "Content ...".
- Type in the value/content associated with the field (e.g., "Research").
3) Click Add
- Click the "Add" button to add the new field and its content.
After adding all desired custom fields, you can click OK to save or Cancel to discard the changes.
The added Custom field will appear accordingly in the report, in the chosen location.

5. Detailed locus page:
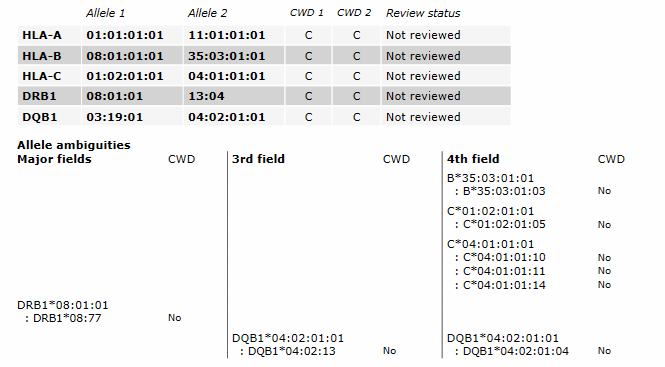
- Typing result: shows the typing result with review status and amount of edits, and the allele ambiguities. The allele ambiguties are grouped in 3 columns:
- Major fields: includes first field ambiguities (for example for DPB1), second field ambiguities and all other expression variants (for example null alleles)
- Third field ambiguities
- Fourth field ambiguities
- Images: select here which picture will be shown for each locus. Options: locus alignment, base calling statistics (base variation), coverage statistics (depth of coverage) and/or QV statistics (quality values).
- Edits: shows a table with all single base edits and phasing edits that have been applied.
- Analysis context: shows date of analysis, IMGT library used and software version used.
- Comments: shows the comments that have been added to the locus.
6. Typing information:
- Typing results resolution: here you can select what information you want to see in the typing result for the whole report. At least one of these boxes has to be selected for the report.
- Conclusive: the conclusive typing result is shown, with the resolution as defined in the Preferences settings.
- Optimized: the optimized typing result is shown, with the minimal required resolution as defined in the Preferences settings.
- Full (standard): the standard typing result is shown, with all fields. This result is always shown, by default.
- P group: the typing result of the P group is shown.
- G group: the typing result of the G group is shown.
- Serology: shows serology information for each allele in the report.
- CWD status: when this box is checked, the CWD status is included for each allele in the report.
- C = common
- WD = well documented
- No = not on the CWD list
- Bw4/Bw6 status: when this box is checked, the Bw4/Bw6 status is included for each HLA-B allele in the report.
7. Locus selection by review status:
Here you can select by review status which typing results per locus will be shown in the report: in the typing results table of the sample summary and in a detailed locus page.
All loci which are present in the sample will be shown in the typing results table of the sample summary, but only those typing results will be shown which have the review status that has been selected. The loci with another review status will be shown as 'Not reviewed'.
- Not reviewed: shows the typing results of the loci that have not been reviewed.
- Rejected: shows the typing results of the loci that have been rejected.
- First reviewer approved: shows the typing results of the loci that have been approved by the first reviewer.
- Second reviewer approved: shows the typing results of the loci that have been approved by the second reviewer.
8. Show preview:
This button opens a preview of the PDF report in an external PDF viewer. The default PDF viewer of the Windows user will be opened.
9. Save in reports or Save as
Save in reports: the report is saved automatically as a PDF file in the Reports folder on the computer.
Save as: a window opens where you can select a location and a name for the PDF file of the report.
Footer:
Each page of the report has a footer, which shows project name, sample name, page number (starts at 1 for each sample separately), report date and the NGSengine version used to print the report:
